You built a brand-new top of the line computer, and yet people still talk about taking that build to the next level.
You’ve seen pictures of water-cooled brass tubing in custom built rigs and have no idea why anyone would go through that trouble just to run a computer.
Welcome to Overclocking!
What is Overclocking
Overclocking is simply pushing a component (Usually the GPU or CPU) beyond the factory established settings to increase performance.
Overclocking is a simple way to gain an edge with your computer and push it to the limits. It also increases heat, wear, and tear on your components. Great care must be taken when overclocking to insure you do not put too much strain on the parts that are being used.
Despite the risks, many people have turned overclocking into a well-loved hobby akin to tuning the engine of a car to see gains in performance. This guide will walk you through the process of overclocking a CPU.
Learning to Overclock is an intermediate task, it isn’t particularly hard but it requires in-depth understanding of computer components and a bit of patience.
Years ago the process used to mystify even the most Battle-hardened PC Gamers but advances in technology have made it a far more approachable, safe, and fun aspect of PC Building!
Why you should do it
Sometimes a component has massive potential to push the limits beyond what the part is sold at (For instance, the recent world record for overclocking was broken by overclocking a Ryzen CPU to 5.8ghz).
The process can be simple and safe enough for squeezing a few more frames out of the Witcher 3 or extending a little more life to an old component. If done right, overclocking can add large gains to a process that is bound by the CPU or games that use all eight cores.
Also it’s just fun! Many tech enthusiasts Overclock to push the limits of what they can do with a PC, building elaborate set-ups that run games at insane settings. Even if you don’t see massive performance increases, there is a joy in learning to take ownership of your rig.
Why you should NOT do it
Overclocking increases the amount of heat and strain that is placed upon your CPU. The CPU is already handling a tremendous amount of power. Without using Thermal Paste and heatsinks, just the normal amount of voltage running through a CPU would cause it to break or even catch fire within several seconds.
Fortunately, a little thermal paste, a decent case, and a stock CPU cooler and your CPU will never venture into dangerous temperatures. For those who push the limits though, temperature matters. Technology has allowed us to cool CPUs in ways we never thought possible before.
The use of large fans, liquid cooling, and even liquid nitrogen can keep a CPU from overheating but it takes money, time, and more care than the average PC User is used to giving.
Overclocking increases heat and power consumption within the desktop computer beyond what was originally intended. It can possibly shorten the lifespan of a part that is being used. Finally, while the risk is minimal if using good parts and safe procedures, overclocking can result in the destruction of a component.
Can You Overclock Your Existing CPU?
There are many different models found in CPU families and factors such as age, heat produced, return of value, and being unlocked all factor into whether overclocking is for you.
Overclocking a very old CPU, may increase performance but the CPU itself could be dated enough that it still isn’t a practical solution to the need for more power. Unfortunately that Pentium 2 from a decade ago will not be running a 4k game anytime soon, even if highly overclocked. Still, modern CPU gain much from the process.
The primary difference between a CPU that is good for overclocking and one that would not be very good at overclocking, is whether or not the CPU has been unlocked. A locked CPU can usually be slightly overclocked through automatic software, but they cannot exceed a low limit set by the manufacturer.
Instead of manually being able to change settings, a locked CPU is basically only capable of the fluctuations in performance that are necessary for a computer to allocate more resources for heavier tasks and there is little control.
There is usually nomenclature for each processor family and it might take a little bit of research beforehand to find out which models are unlocked.
For instance Intel designates many of the unlocked models within the Intel family range by using the letter K or X. Models such as the i5-7600K or i7-6950X indicate that the model is unlocked. Make sure to look up particular model and see if it is unlocked.
Why Does An Unlocked CPU Matter?
A CPU that is unlocked allows you to change the multiplier in settings, this in turn changes the frequency that the CPU runs at. The faster the CPU, the better performance you have.
Often this difference will cause a significant jump in price between two similar CPU models. It’s a common mistake to assume this price difference is because of performance, when it is merely the locked vs. unlocked feature of the CPUs. For example the i5-6500 and i5-6600K differ very little, except the K model is unlocked.
Finally, another aspect affecting the ability to Overclock is the technical build of the CPU itself. There is some variation, among even the same CPU line, due to silicon not being a perfect material. This means some CPU models may vary by as much as 1GHz purely because of the quality of the parts.
Overclocking a Newer Model vs. an Older Model
As technology is rapidly changing, overclocking has become easier and easier. Modern Intel processors for instance allow more flexibility, stability, lower variance between chips, and no longer need high-end motherboards.
Old models may still benefit from investing in a higher quality motherboard and still run risks such as loss of data to a SATA drive if overclocking in a risky manner. Due to this, it is very important to research your model of CPU for the best overclocking methods.
Equally important thing here is keeping your important data in a back-up external hard drive.
How long will it take?
Overclocking is not a simple quick process. It takes long stress testing sessions and multiple attempts to make sure that the CPU is running correctly. Expect to spend a few days or even a week testing and playing around with settings to hit the correct sweet spot for your CPU.
AMD vs. Intel
Recently AMD just entered the CPU race as a major competitor to Intel (And this will continue as Ryzen 5 and more products are announced). Traditionally these two competitors are the main supplier of CPU’s to the average consumer.
Until recently though, Intel had a product line primarily superior to that of AMD. Since they are now on a level playing field, AMD will start to be seen more frequently. Currently the Ryzen line is looking like the primary competitor for overclocking enthusiasts.
Other Precautions
Before Overclocking, make sure you are aware of the risks physically to your hardware and also the manufacturer’s stance on overclocking.
Often a mistake while overclocking will void the warranty of a part, as it is not always covered to tinker with your CPU. This doesn’t mean they necessarily test for overclocking when submitting an RMA, but it is something to keep in mind.
Also keep in mind that since no two processors will ever overclock the same, you need to be aware of what works for your hardware instead of following set presets. There is a large variance among the same model due to imperfections in the CPU production process.
This means overclocking may give incredible results, or reveal that you have a blow average CPU. Unfortunately, this isn’t covered by the manufacturer as a reason to replace your CPU.
Getting Started: What tools/devices do you need to Overclock?
- A CPU that can be overclocked
- Thermal Paste (If you need to reset your Heatsink before starting)
- Heatsink/Cooling (Depending on how far you are pushing the computer)
- AIDA64
- Overclocking software (Normally found in the BIOS/UEFI). Some older CPU’s may not be as easy to overclock due to the software available. For the purpose of this test, we will be using the UEFI BIOS that comes with an ASUS motherboard.
- Optional: Quality Motherboard. The biggest difference between motherboards is in features and some are designed to help regulate overclocking better than others. It is by no means necessary for newer Intel processors such as Skylake, but for older CPUs, another way to have a good system for overclocking is to invest in a motherboard with a higher quality voltage regulator module.
- A Smart Phone or Wi-Fi enabled device! When you are changing things in the BIOS, you won’t have internet access to check for information, so make sure you have something readily available in case you get stuck or need help.
If your computer is running, it already has some level of heat dispersing technology, be it a stock fan and thermal paste or even more. Some techies prefer to reset the heatsink on the CPU with higher quality thermal paste. It is usually suggested to switch the heatsink and cooling set-up out for something nicer if you are really pushing your CPU to its limits.
In fact, some CPU combinations no longer offer stock cooling out of the box as they are designed to be overclocked.
There is a lot of debate about what the best set-up is, but as a rule of thumb, the more heat that you produce overclocking without being able to disperse, the more dangerous overclocking is. As such a good cooling set-up is vital to make extreme changes but most CPUs can be overclocked slightly without much extra effort and the cooling system that came with them.
WARNING: Due to the inherent risk of Overclocking, do not attempt to Overclock your CPU unless you have thoroughly studied and are willing to take the risk of damaging or even breaking components in your rig.
This is not likely to happen with a modern CPU but being irresponsible can cause a lot of damage and cost a bit of cash. As well as be embarrassing when your friends want to play Dota and you must run out and purchase a new motherboard.
Preparation
Before starting on the actual work of overclocking, make sure to do several basic system checks and system maintenance.
Update the BIOS of the motherboard, the CPU firmware, and all the drivers for your components before starting.
Next do a visual inspection of the fans, making sure that all of them are running and functioning correctly. Finally, if you see dust or significant build-up in the desktop, make sure to clean that out with compressed air.
How to Overclock Your CPU
Let’s Go!
Now it’s fun time!
Step 1: Set Up Test To Check CPU Stability
Checking for defects in the CPU before starting the journey to overclock is absolutely necessary. This can be done running a program such as AIDA64, as well as numerous programs that may come with the motherboard that was purchased.
For the purpose of this guide, we will be using AIDA64. Not all programs are equal, for instance newer versions of Prime95 not only test a very specific part of the CPU, the program may in fact override the settings that are enabled causing damage. It’s best to do some research and stick to safer programs at first.
So download AIDA64 and get this puppy running!
Open up AIDA64.
Select System Stability Test.
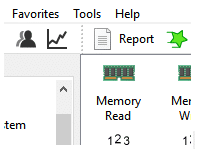
After this, deselect every box except for Stress CPU.
At the bottom make sure to click the CPUID button as well.
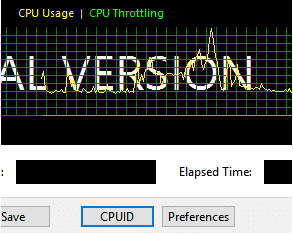
This should bring up a panel with a lot of information about your CPU.
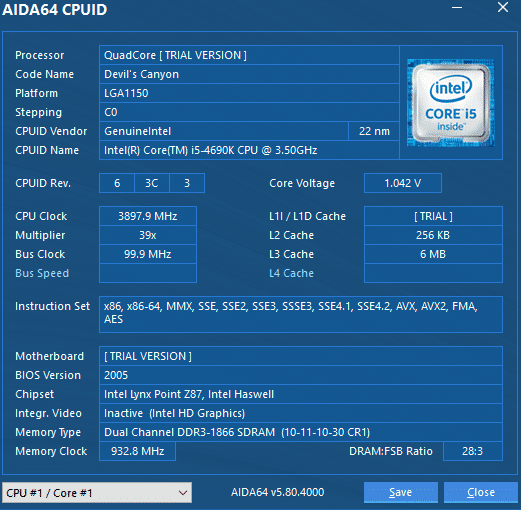
Don’t run the test yet as we are still setting up our testing environment.
Step 2: Install CPU Temperature checking software
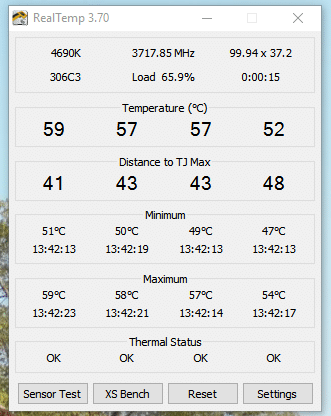
There are many options, often included with motherboards or other components. For this purpose, we will use a simple program called RealTemp.
Realtemp allows you to see the temperature of all the cores as well as useful information like the distance to TJ Max (Not the store, the Tjunction Max). For this 4690K, TJ Max is the temperature where the CPU is so hot, shutdown is initialized to save it from being destroyed or damaged.
Step 3: Run stress tests
Now that you are ready, turn to AIDA64 and run the test!
The test should run for 15 minutes to an hour before you stop. During this test, keep an eye out for hot temperatures, system instability, the dreaded blue screen of death, crashes, or even the program telling you that you have a naughty CPU and it isn’t running right. This will help diagnose any possible CPU problems before starting the overclocking process. Keep an eye on temperatures. At this point we are not full on testing the machine, as that will come during the overclocking process, this is just a short teaser to see if you’ve been sold snake oil.
If you notice any of these problems, make sure to research the root cause and troubleshoot before proceeding with overclocking. For instance, a case with limited airflow and a bad fan may cause unnecessary heat, and that should be remedied before going any further.
If none of these problems occur, move onto Step 4! Congratulations! Your CPU is most likely healthy enough to overclock (You can’t really tell in just a short span of time all the variables in a CPU, but you can know there is likely nothing catastrophic going on.)
Step 4: Enter the BIOS and Set-Up the Syste
It’s clocking time! The next step is to enter the UEFI BIOS.
The BIOS or UEFI can be reached by pressing a key as soon as your computer starts booting. Often this key is F2 or Del, but depending on the age and manufacturer of your build, it may be different. Normally the startup screen will notify you and tell you which key to press to access the BIOS/UEFI. If you have an SSD, this may be a very short time frame. Many modern motherboards allow overclocking from the BIOS/UEFI. For now, just start smashing the delete and F2 key repeatedly when the computer boots up. This most likely will bring you to promised land.
Every UEFI tends to look a little different so make sure to look up for a guide for your UEFI if you get lost.
For this UEFI we are going to enter advanced mode, which can be found at the bottom of the screen.

We are going to be working primarily in the Ai Tweaker tab.
![]()
Step 5: Should I Auto overclock?
This is the easiest and safest way to begin your journey towards overclocking!
Often a Motherboard will come with settings that allow you to automatically overclock the CPU, usually this is within very safe boundaries and doesn’t represent the full-fledged boosts you can get from pushing your CPU. If you are uncomfortable with changing voltage, multipliers, and running stress tests, this is a great option. The UEFI will usually give you a couple of options, and often ask what the computer is used for (We all know gaming is why we use computers…)
Look at the guide that comes with your Motherboard to see where you should start with this.
Step 6: Changing the Multiplier
Roll up those sleeves, math is coming!

The CPU Core Ratio is where you can change the settings for the multiplier. Unfortunately, this only works on unlocked CPU as the locked ones do not allow changes on this level.
Select Sync All Cores>

This should bring up a list of the cores located on your machine.
Next you can change the top core from Auto to a number

This number is known as the multiplier. It represents the Base Clock multiplied by the Multiplier. For instance, a multiplier of 45 applied to a base clock of 100 would result in a 4.5 GHz CPU. Knowing this can give you a good feel for where you should set your multiplier for dialing in the Core (For instance, setting the multiplier on a 3 GHz CPU to 50 might be such a drastic shift that it most likely will not boot)
The base-clock is usually set to 100 and best not to change (Advanced users might slightly change this by MINIMAL amounts, but messing up the base-clock is where a CPU begins to worship the fire gods).
The easiest way to overclock a CPU is by changing the multiplier on all the cores to something a little bit higher (For instance with an i5 4690K one might change it from 35 to 37 initially). You can get very different numbers here depending on the CPU you own, so make sure to do a little research and slowly increment this number.
Start by boosting the multiplier by 1! You are new at this, no need to be a hero.
Step 7: Increasing the voltage
Next Scroll down to the voltage settings. It will look like this.
Set the voltage to manual mode

The sweet spot for voltage is between 1.2 and 1.4 Volts. Overclocking inherently requires giving more voltage to the CPU to increase its strength. At this point, feel free to boost it in slight increments but do not exceed the acceptable range (1.2-1.4 is often a good range but make sure to look up what is recommended when overclocking your own CPU). When we reboot, we will dial in the best strength for a multiplier, and then eventually after finding that, start to increase the voltage. For now though, just increase it slightly.
Manual mode will run the CPU at the recommended voltage, which will be good for testing but eventually we will want to switch the CPU to adaptive mode.
Adaptive Mode versus Auto Mode

Adaptive Mode is an awesome little tool that is best for after you have dialed in your overclocking.
Adaptive means that when the CPU is idle, it will not run at the modified clock speeds and in fact will dwindle down to the normal factory settings. This greatly reduces stress on the CPU (Overclocking all day, every day, can give your CPU quite the headache). We’ll come back to this, but for now, note the location!
Step 8: Back to Benchmarking
Save your settings and boot your precious computer. This part is where the finesse begins! Going back to our first couple of steps, you need to load up your stress testing programs and start benchmarking the CPU.
Run AIDA64 for 15 minutes or so, look for problems and see what happens. Again we are looking for crashes, the Blue Screen of Death, or unsafe temperatures (Over 80 Celsius under stress is entering the danger zone. I like to keep my CPU from even entering that threshold).

(This guy isn’t very popular at parties)
If your CPU is running smooth after a bit, go back to the UEFI BIOS and push the multiplier up by one.
Step 9: Find the sweet spot!
Finding what works best for your CPU and your hardware is different for everybody. The key is to make sure that you are falling within good ranges for temperature as well as voltage.
Keep repeating the process, until you start to see unsafe temperatures or a BOS. Once you are starting to see system decay. Reboot, and return! You can change the voltage to fine tune the CPU or drop a multiplier to a lower setting. Fine tuning is usually done by increasing the voltage in very small increments (As low as .01 volts.)
Eventually you will start to see the best balance of performance, and key in some good settings.
Step 10: Test, Test, TEST!
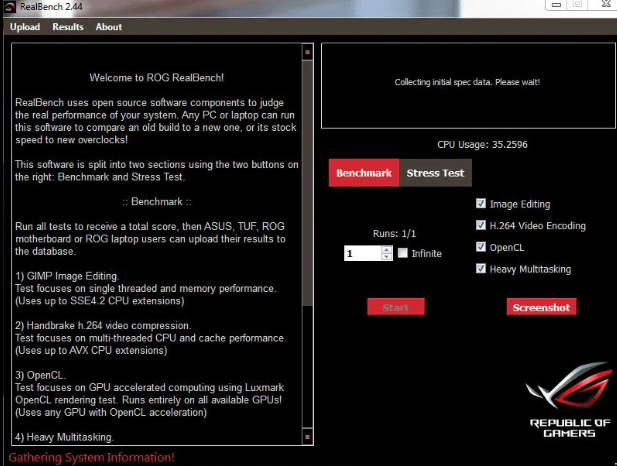
After dialing in your CPU, increasing voltage within a safe range, increasing the multiplier to a safe factor, and making sure you have stable performance. The next step is to run a long-term CPU test. This consists of 4-6 hours with a heavy benchmarking program such as Realbench and 24 hours of testing with AIDA64. Also feel free to use a CPU intensive game, such as Ashes of the Singularity or ARMA.
Why all the tests?
Even after a couple hours of testing, a CPU might have problems that haven’t been discovered with the current set-up. This means that a couple weeks into using an overclocked CPU, you might find yourself accidentally seeing ol’ blue screen of death pop-up and rudely ruin whatever you are working on or playing. It takes time to test for system stability and this can’t happen in a few minutes.
Different programs test different aspects of the CPU and can give you confidence your CPU is singing like a canary.
After finishing testing and finding no flaws. Go back to the UEFI and change it to Adaptive Mode. Save the changes, and reboot.
Celebrate! You have achieved a milestone in your understanding of the PC Master Race! You can now overclock a CPU. This is a big step in getting your feet wet in the customization and handling of the PC you use.
Conclusion
Did you enjoy this overclocking tutorial? Overclocking is like any craft, it can be simple at a glance but there are people pushing computers to insane extremes in order to see just what modern technology can do. It is very important to be responsible when overclocking. While a little challenging and slightly risky, it is one of the most rewarding experiences you can have with your machine. It gives better performance and a sense of ownership in what is under the hood, running inside your case.
If this guide helped you, please smash the share button and spread the word! Also, comment down below and tell us how your overclocking journey has been and if this guide has been helpful! We love walking through technology with you and are excited to see more people fall in love with the art of PC building.