When it comes to OSes for gaming, Windows OS by Microsoft is the most popular option out there.
No seriously, you can’t even imagine PC gaming without Windows. Yes, there are some other options in the form of OS X and Linux, but they support a very limited number of games.
But even among Windows OS, you have different options like Windows 7, 8 and 10.
Why Windows 10 is the Only Alternative For You
Many of the older PC still run Windows 7 and 8, but Windows 10 is most widely used Windows version right now, with up to half of the PC/laptop devices running on it. Windows 7 is closely behind windows 10, in terms of usage, but lacks some bells and whistles (due to being older) that come with the latter such as DirectX 12 support and more hardware compatibility.
That’s the reason Windows 10 is your best option right now.
But here’s one problem.
Although a popular choice among gamers, Windows OS isn’t without faults. You can find many different flaws in this OS that are virtually non-existent in other OSes like OS X and Linux distros, such as poor Memory management and BSOD.
These issues can be solved, of course, but can take some precious time of yours. That’s why you better optimize windows 10 before any of these issues occur.
Not all the tips I have listed here are advanced, but they really work in making your gaming as smooth as possible.
1. Upgrade Graphics Drivers
Although you should update all the drivers of your PC, having the latest graphics drivers is most important of them all.
It doesn’t matter whether you have an Nvidia or AMD graphics card since both of these companies make updating drivers really easy. All you have to do is go to their respective sites here and here.
Then you just have to specify just graphics card version and download those specific drivers that will come as a .zip file.
2. Change Power Options
Since you’re into gaming, it’s good to utilize every bit of power juice of your PC. You can do so by simply going into your power settings and choose “High Performance mode”.
This setting is even more critical when you play games on your laptop. It’s because manufacturers deliberately make your laptop under-perform to prolong its battery life. With High Performance mode turned on, you’ll hopefully get better performance.
3. Changes in MCSS Service
Most PC games use a Windows OS service called “Multimedia Class Scheduler”(MCSS). There’s nothing really wrong in this service except for the fact that it only utilizes 80% of your total CPU processing power.
To utilize that 20%, you have to make some changes in Windows Registry Editor.
Note: Making any invalid changes in registry editor of your PC can create some unwanted problems in your PC. So it’s good to have a backup of registry file before you make any changes.
OK, Here’s how you can make changes in MCSS service:
- Type Regedit into the search bar to launch Registry Editor
- Once you’ve opened it, Go to HKEY_LOCAL_MACHINESOFTWAREMicrosoftWindows NTCurrentVersionMultimediaSystemProfile
- After this, Click Edit > New > DWORD to add a new DWORD and name it SystemResponsiveness. Set its value to 00000000 to prioritize gaming.
- In case a DWORD with the name of SystemResponsiveness has already been created, you don’t need to create a new one. Just edit the value of the current one to 00000000.
After this you need to go to HKEY_LOCAL_MACHINESOFTWAREMicrosoftWindows NTCurrentVersionMultimediaSystemProfileTasksGames, and make the following changes:
- Set GPU Priority to 8
- Set Priority to 6
- Set Scheduling Category to High.
That’s it, now you can close the Registry Editor.
4. Disable Mouse Acceleration
Mouse acceleration is a setting in your PC which is used to modify the cursor acceleration on your screen.
It means if you set a high mouse-acceleration then the cursor will cover greater on-screen distance than with the low mouse acceleration, provided that your mouse movement remains the same.
In simple words, mouse acceleration increases your mouse’ sensitivity.
Although this feature really helps in some other areas such as office work and browsing the web, it’s potentially bad from the gaming perspective.
Why is it so?
Well, it’s not really difficult to figure out why is it so. The first problem (if you enable this feature) is that it creates an inconsistency with your movements and lower the overall accuracy. This situation is even more critical in FPS games where you need high accuracy.
Imagine you’re playing counter strike. If you have a high mouse acceleration set at that time, you will move your mouse with more-than-required force and will miss your target easily.
The second issue is related to overall gaming, rather than just FPS. We develop muscle memory for specific tasks, only by doing those tasks over and over again. Same is the case with PC gaming. When we play games, our hands do instantaneous work through keyboard and mouse because we’re used to playing with that mouse and keyboard.
Now imagine you have messed up with mouse acceleration and now all of a sudden you’re having the problem in even properly navigating through your game. Considering these two reasons, it’s a no-brainer that you should disable mouse acceleration feature for once and all.
Here’s you can it:
- Go to Control Panel > Hardware and Sound > Devices and Printers
- In the Devices and Printers section, your mouse will be listed under Devices area. Sometimes it will labelled just as Bluetooth Device, or USB device, instead of its proper name.
Now that you have opened your mouse settings, simply go to the pointer options tab, and uncheck the checkbox against Enhance pointer precision. Click on Apply, and you’re good to go.
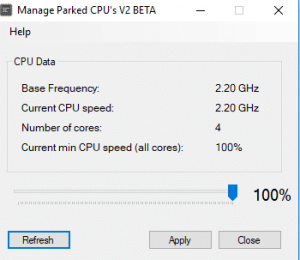
5. Unpark CPU Cores and Threads
Core parking is a mechanism through which an operating system shuts down or “parks” a CPU core if it considers that that core is not being utilized properly. Once a CPU core has been parked, it will no longer perform any function and will not draw any power either.
After some time, when/if the OS has determined the need for an extra power source, it will “wake” that parked CPU core, and then that CPU core will start working again.
In basic terms, Core parking is just a power-saving mode for your CPU cores, and if you want to take your CPU performance to a whole new level, you should try CPU unparking.
OK, so here’s how this process goes.
- There’s a free CPU unparking software, which you can download as a .zip file from here
- Once you’ve downloaded it, you need to install it from the .zip file and run as an Administrator.
- Once you’ve opened it, you will see a performance slider, and you have to move it up to 100%
6. Tweak Nvidia Graphics Settings
Most of the PC gamers have an Nvidia Graphics card installed, and there are many things you can change there in order to boost your PC.
To do so, you need to open the Nvidia control panel first. Usually, it’s placed among the “Hidden Items” in the Taskbar, or in Desktop context menu. If that’s not the case, it might have been missing.
Anyways, once you’ve opened it, you’ll see some options. From those options, you need to click on “Manage 3D settings”. After clicking on that option, you’ll see different settings such as Ambient Occlusion and Anti-aliasing.
Here you need to make some changes.
- If you’re using a single monitor for gaming, choose single display performance mode for Multi-display/Mixed-GPU acceleration.
- Turn off Shader Cache. Some people experience crashes and Stutters with this setting being on.
- Set Texture Filtering Quality to Performance.
- Leave the rest of the settings as they are.
7. Bloatware Removal
Like most OSes, Windows 10 comes with a lot of pre-installed apps, which is also collectively known as bloatware. These apps aren’t entirely bad, but they are pretty much useless for gaming perspective. That’s why it’s better to remove them. Apart from helping you during gaming, it will also make your PC run better.
Universal apps like people, maps, and one note, etc. are installed by default, and you’ll need Windows Powershell to remove them. It’s a command-line based framework by Windows that lets you run different commands (just like cmd).
To open Powershell, Go to search bar and Type Powershell. After this, you have to run this app as an administrator.
At last, you just need to enter the command about the app you want to remove. Below are some of the basic commands to remove different apps.
3D Builder: Get-AppxPackage *3dbuilder* | Remove-AppxPackage
Alarms and Clock: Get-AppxPackage *windowsalarms* | Remove-AppxPackage
Calculator: Get-AppxPackage *windowscalculator* | Remove-AppxPackage
Calendar and Mail: Get-AppxPackage *windowscommunicationsapps* | Remove-AppxPackage
Camera: Get-AppxPackage *windowscamera* | Remove-AppxPackage
Get Office: Get-AppxPackage *officehub* | Remove-AppxPackage
Get Skype: Get-AppxPackage *skypeapp* | Remove-AppxPackage
Get Started: Get-AppxPackage *getstarted* | Remove-AppxPackage
Groove Music: Get-AppxPackage *zunemusic* | Remove-AppxPackage
Maps: Get-AppxPackage *windowsmaps* | Remove-AppxPackage
Microsoft Solitaire Collection: Get-AppxPackage *solitairecollection* | Remove-AppxPackage
Money: Get-AppxPackage *bingfinance* | Remove-AppxPackage
Movies & TV: Get-AppxPackage *zunevideo* | Remove-AppxPackage
News: Get-AppxPackage *bingnews* | Remove-AppxPackage
OneNote: Get-AppxPackage *onenote* | Remove-AppxPackage
People: Get-AppxPackage *people* | Remove-AppxPackage
Phone Companion: Get-AppxPackage *windowsphone* | Remove-AppxPackage
Photos: Get-AppxPackage *photos* | Remove-AppxPackage
Store: Get-AppxPackage *windowsstore* | Remove-AppxPackage
Sports: Get-AppxPackage *bingsports* | Remove-AppxPackage
Voice Recorder: Get-AppxPackage *soundrecorder* | Remove-AppxPackage
Weather: Get-AppxPackage *bingweather* | Remove-AppxPackage
Xbox: Get-AppxPackage *xboxapp* | Remove-AppxPackage
8. Disable Nagle’s Algorithm
Until now we have made tweaks to run offline games better. But online games are a whole different beast due to their dependency on your home network. That’s why they require some extra work. The being said, if you aren’t into online gaming, you can skip this part.
Almost all of the below tweaks will be done with Registry Editor. That’s why you should make a backup of this file – in case things get messy.
Nagle’s Algorithm is an algorithm to make TCP/IP transfer rate more efficient. In case you want, you can go through all the technical details here. In simpler terms, this algorithm combines small-sized data packets into a larger one.
On the surface, this algorithm looks good and work proficiently in many computing areas. Unfortunately, online gaming isn’t one of them.
Since, under Nagle’s Algorithm, TCP data packets have to wait at the sender’s end until they get full inputs, this can inadvertently cause a significant lag.
Since Nagle’s Algo is enabled by default in Windows, you can reduce lag during online games, by disabling it.
- First, we’ll go back to the Registry Editor, by typing regedit in Windows Search Bar
- Once this file opens, Go to HKEY_LOCAL_MACHINE > SYSTEM > CurrentControlSet > services > Tcpip > Parameters >Interfaces
- In the interface tab, there is a chance that you’ll see many NIC-IDs. Also known as the network adapter, NIC is a physical component that connects a PC to a network, and the number of NIC-IDs depends on the different network connections you’re having on your PC. It’s because each time you create a new network, Windows OS creates a new NIC-ID.
Before going any further, you should know the complete the IP address of your PC because it’s necessary to recognize the current NIC-ID. In case you don’t know about yours, simply write ipconfig in cmd, and you’re done.
Ok, now that we know IP address of our PC, let’s go back to our registry editor. In the registry editor, you need to match your IP address with the values in the right pane. Most probably, the IP address you’re trying to match will be against the labels like ‘IPAddress’ or ‘DhcpIPAddress’.
When you’ve correctly matched the IP address of a NIC-ID with your PC’s IP address, you’ll have to create two new D-WORDS (by clicking Edit > New > D-WORD) in that NIC-ID folder. Name these D-WORDS as TcpAckFrequency (to send out data packets immediately), TCPNoDelay (for no nagling) and TcpDelAckTicks (to reduce the time for acknowledgment message). Set value 1 for the first two and 0 for the last one.
Close Registry file, reboot your PC, and you’ve finally disabled Nagle’s algorithm.
9. Disable Network Throttling
Apart from Nagle’s algorithm, windows also have network throttling mechanism which throttles your data packets. The reason why there’s such a mechanism in first place is that processing the data packets is a resource-demanding task.
But since you need to utilize every drop of power juice we have, it’s better to disable network throttling.
To do so, we’ll have to go back to good ol’ Registry Editor and go to HKEY_LOCAL_MACHINE > SOFTWARE > Microsoft > Windows NT > CurrentVersion > Multimedia > SystemProfile.
Under SystemProfile Tab, create a new DWORD with the name of NetworkThrottlingIndex, and set its value to ffffffff. ffffffff hexadecimal value means no network throttling.
10. Disable LargeSystemCache
LargeSystemCache is a registry setting that optimizes file-sharing among local networks but is reported to have some conflict with different ATI Graphics cards. That’s why if you have an ATI card for gaming, it’s better to disable this setting.
Simply go to HKEY_LOCAL_MACHINE > SYSTEM > CurrentControlSet > Control > Session Manager > Memory Management. Here you need to create a DWORD with name of LargeSystemCache, and set its value to 0.
11. Disable Windows Update Delivery Optimization
Type settings in the search bar
Then, go to updates and security
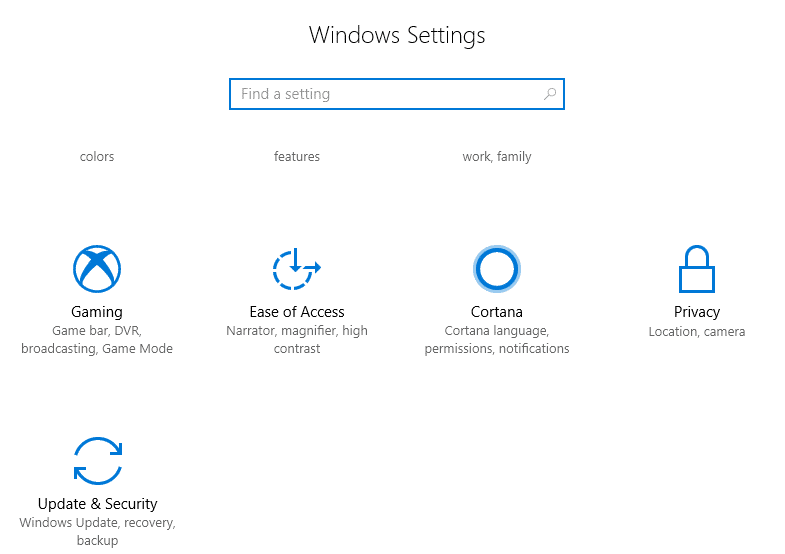
Click on Windows Update Tab, and then on Advanced Options.
Next, click on delivery optimization and turn off the toggle that says Allow Download From Other PCs.
12. Disable OneDrive
If you don’t use one drive, you should disable it when you’re gaming. For that, you just have to go to the taskbar, right-click on One Drive icon and click Quit One Drive.